Create and manage groups in VIDIZMO
Create and Manage Groups in VIDIZMO
To manage groups in VIDIZMO, users with access rights to user management features can create, edit, or delete groups as per their requirements.
Creating groups allows you to manage your users by applying permission settings to the entire group instead of setting them individually for each user. This means that the settings applied to a group will also be applied to every group member, saving time and administrative hassle. Additionally, access to content can be assigned at the group level.
To learn about Groups, see Understanding Groups.
Prerequisites:
- To manage users in a group, the individual must either be a member of the Group Manager group or have Group Management permissions enabled.
Create a Group
To create a group, follow these steps.
- From the Portal's Home page, click on the navigation menu on the top left.
- Expand the Admin tab.
- Select Users & Groups to open the page.
`
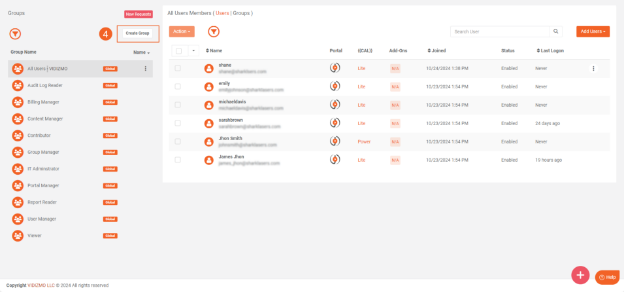
4. In the Groups section (left-hand side), select the Create Group button.
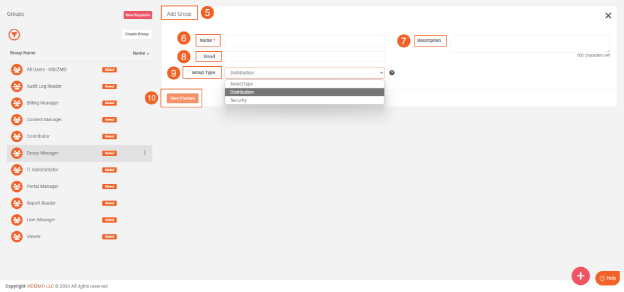
5. To create a group, fill out the following field on the Add Group page.
6. Enter the Group Name.
7. Enter the Group Description to explain its purpose.
8. Enter the Email of the people you want to add to the group.
9. Select the group type from the drop-down menu. Choose either Security Group or Distribution Group.
- The Distributed Group type is primarily used for group users and does not support managing access permissions. Users in a distribution group only have permissions granted to them individually through their CAL.
- Security Group type allows you to assign predefined permissions at the group level. Users in the security group inherit the group's permissions.
If you select the Security Group, a set of available permissions will be displayed. You can enable it by toggling the respective options.
Note: Permissions applied to a security group affect all users in the group and align with the features defined in their CALs.
10. Click Save Changes
Edit a Group
To edit a group, follow these steps.
-
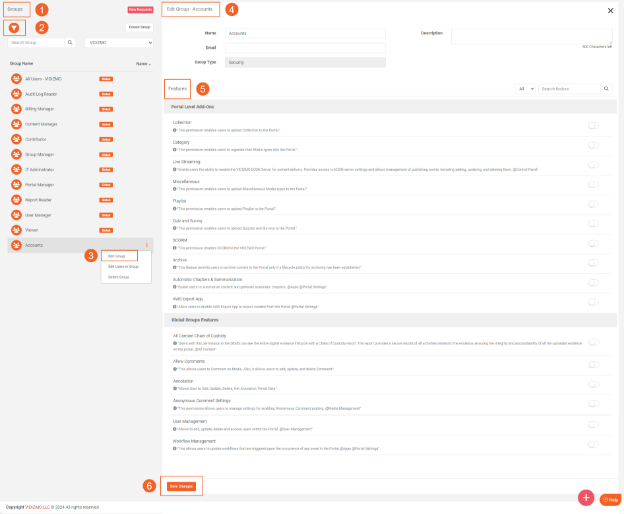
In the Groups section (left-hand side), select the group to which you want to add the user.
-
Optionally, click the Filter icon to reveal options.
A) Enter the group name to search.
B) Choose a portal from the dropdown menu or use the All-Portals filter.
3. Once the relevant group is displayed, click the overflow menu (three dots) for additional actions.
4. Select Edit Group option.
5. To edit a group, edit the fields you want to edit on the Add Group page.
Note: Once a group is created, the group type (Security or Distribution) cannot be edited.
A). When you select a security group to edit, you can modify the permissions set by toggling the toggle buttons for each feature permission to turn on or off.
- Click Save Changes
Delete a Group
To delete a group, follow these steps.
- Select the group you want to delete in the Groups section.
- Optionally, click the Filter icon to search group by name or portal.
- Once the relevant group is displayed, click the overflow menu next to the group name.
- Select Delete Group.
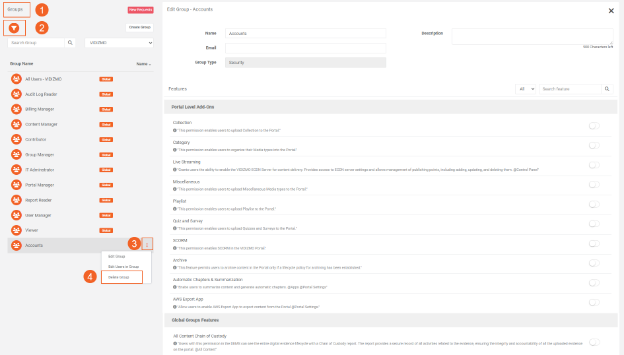
- A confirmation message will appear. Click on the Delete button to confirm the deletion.
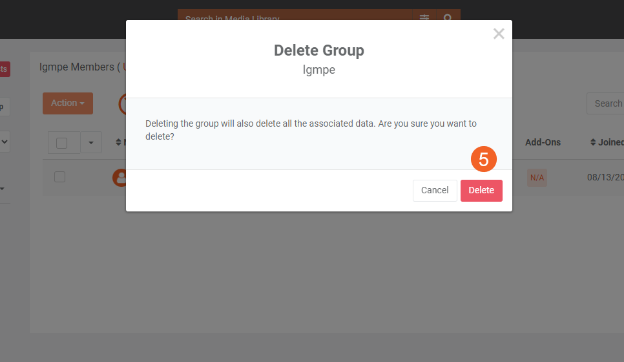
Consider the following points before deleting a group:
- Default groups cannot be deleted.
- If the non –default group either distributed or security type of group is deleted, the feature permissions assigned to the user within this group will also be removed. However, individual permissions granted through the CAL persist even after group deletion.